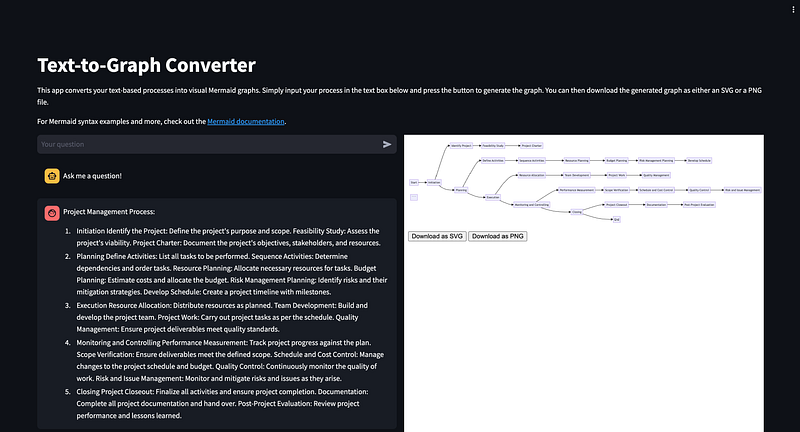
Innovative Text-to-Graph Tool: Streamlit & GPT-4 in Action
Written on
Introduction to the Text-to-Graph Converter
Transforming text into visual formats has become significantly more straightforward! In this guide, we will explore how to utilize Streamlit alongside OpenAI’s GPT-4 to develop a Text-to-Graph Converter application. This innovative tool can convert your narrative descriptions into Mermaid diagrams, thus simplifying complex data into visually appealing graphics. Let’s get started!

Why Use Visualizations?
Visualizing data is essential for effective understanding, analysis, and presentation. However, the traditional methods of creating these visuals can be laborious and often require specialized knowledge that isn’t universally held. This is where our Text-to-Graph Converter shines. By harnessing the power of Generative AI, specifically GPT-4, along with the user-friendly interface of Streamlit, we can construct an application that democratizes access to visual data representation. All you need is an API key to interact with the AI model, and you’re ready to convert your text into engaging graphs.
Step 1: Setting Up Your Environment
Before we delve into coding, make sure you have Python installed and that you can add packages via pip. Begin by installing Streamlit, which will serve as the framework for our application.
pip install streamlit
Step 2: Configuring Your Streamlit Application
Start by importing the essential libraries:
import streamlit as st
import streamlit.components.v1 as components
import json
import requests
Next, configure your Streamlit page to enhance the user experience:
st.set_page_config(page_title="Mermaid", layout="wide")
Step 3: Creating the User Interface
Utilize Streamlit’s functionalities to establish the user interface. This involves setting a title, providing guidance, and creating an input field for users to submit their queries.
st.title('Text-to-Graph Converter')
st.write('This application transforms your text-based processes into visual Mermaid graphs. Just type your process in the textbox below and click the button to generate the graph. You can also download the generated graph as either an SVG or PNG file.')
Step 4: Managing User Input
To handle user input, maintain a session state for storing the input text along with the generated Mermaid code.
if 'merm_code' not in st.session_state:
st.session_state.merm_code = None
if "messages" not in st.session_state.keys():
st.session_state.messages = [{"role": "assistant", "content": "Feel free to ask me anything!"}]
Step 5: Connecting to the AI Model
Set up the connection to the Generative AI model by configuring the API key and defining the model name. This setup allows your application to relay user inputs to the AI and retrieve generated graphs.
API_KEY = "your_secret_key"
model_name = "gpt-4"
url = "your_url"
Step 6: Functions for AI Interaction
Create functions to send user inputs to the AI model and extract relevant sections from the AI's responses. These functions are pivotal for translating textual descriptions into Mermaid syntax.
def extract_segment(text, start_word, end_word=None):
start_index = text.find(start_word)
if start_index == -1:
return None
if end_word:
end_index = text.find(end_word, start_index + len(start_word))
if end_index != -1 and start_index < end_index:
return text[start_index + len(start_word):end_index].strip()
return text[start_index + len(start_word):].strip()
def get_model_completion(message: str):
payload = json.dumps({
"messages": message,
"temperature": 0.2,
})
headers = {
'api-key': API_KEY,
'Content-Type': 'application/json'
}
response = requests.request("POST", url, headers=headers, data=payload)
return json.loads(response.text)["choices"][0]["message"]['content']
Step 7: Displaying the Graph
Finally, use Streamlit components to present the generated graph. This involves rendering the Mermaid diagram within a Streamlit column and enabling download options for the graph in SVG or PNG formats.
col1, col2 = st.columns([10, 10])
with col1:
if user_question := st.chat_input("Your question"):
st.session_state.messages.append({"role": "user", "content": user_question})
for message in st.session_state.messages:
with st.chat_message(message["role"]):
st.write(message["content"])
if user_question:
chat_prompt = [
{"role": "system", "content": "You are a Mermaid assistant specialized in writing Mermaid code."},
{"role": "user", "content": f"User input:n {user_question}n"}
]
if st.session_state.messages[-1]["role"] != "assistant":
with st.chat_message("assistant"):
with st.spinner("Thinking..."):
response, _ = get_model_completion(chat_prompt)
st.write(response)
message = {"role": "assistant", "content": response}
st.session_state.messages.append(message)
st.session_state.merm_code = extract_segment(response, "mermaid", "END")
with col2:
def mermaid(code: str) -> None:
components.html(
f"""
<div>
<pre class="mermaid">
{code}</pre>
<button id="downloadSvgBtn">Download as SVG</button>
<button id="downloadPngBtn">Download as PNG</button>
</div>
<script type="module">
mermaid.initialize({{ startOnLoad: true }});
document.getElementById('downloadSvgBtn').addEventListener('click', function() {{
const svg = document.querySelector('.mermaid svg');
const svgData = new XMLSerializer().serializeToString(svg);
const blob = new Blob([svgData], {{ type: 'image/svg+xml' }});
const url = URL.createObjectURL(blob);
const a = document.createElement('a');
a.href = url;
a.download = 'mermaid_diagram.svg';
document.body.appendChild(a);
a.click();
document.body.removeChild(a);
}});
document.getElementById('downloadPngBtn').addEventListener('click', function() {{
const svg = document.querySelector('.mermaid svg');
const canvas = document.createElement('canvas');
const context = canvas.getContext('2d');
const svgData = new XMLSerializer().serializeToString(svg);
const img = new Image();
img.onload = function() {{
context.drawImage(img, 0, 0);
const pngData = canvas.toDataURL('image/png');
const downloadLink = document.createElement('a');
downloadLink.href = pngData;
downloadLink.download = 'mermaid_diagram.png';
downloadLink.click();
}};
img.src = 'data:image/svg+xml;base64,' + btoa(svgData);
}});
</script>
""",
height=2000
)
if st.session_state.merm_code:
mermaid(f"{st.session_state.merm_code}")
The Future of AI and Web Development
This project showcases the potential of merging AI with web development to enhance information accessibility and interactivity. By converting text into visual graphs, we can represent processes, workflows, or any structured information in a more engaging and understandable manner. Moreover, it serves as an excellent learning opportunity for utilizing modern tools like Streamlit and OpenAI’s GPT models.
In this video, we’ll explore creating impactful data visualizations with a simple prompt, utilizing GPT and Databutton to build a user-friendly charting application.
This video demonstrates how to build web applications using the GPT-4 Vision and Text to Speech (TTS) API, enabling the transformation of videos into AI-generated voiceovers.