# Create Your Personalized Expense Tracking Tool: A Comprehensive Guide
Written on
Chapter 1: Introduction to Expense Tracking
Tracking your expenses is the foundational step towards effective financial management. According to a CNBC article, a staggering 58% of Americans are living paycheck to paycheck, even among those earning $250,000 or more. By monitoring your spending, you can develop better habits that will aid in budgeting and saving. In this guide, I’ll share how I crafted my personalized expense tracking tool, which I’ve successfully utilized since 2016. Additionally, I’ll provide a download link for you to access my template at the end.
Budgeting is crucial as it helps allocate every dollar towards specific objectives, whether it’s building an emergency fund, paying off debts, or saving for a home.
To suit my unique needs, I opted to create my own tool instead of relying on the commercial apps available in app stores. Many of these apps come with a price tag and may not be customizable to fit individual situations. Moreover, updates depend on the developer's schedule, while my own tool can be modified whenever my financial circumstances change.
Personal Finance Tracker for Beginners (Template Included) - This video provides insights on how to create a basic personal finance tracker that can help you manage your expenses effectively.
Chapter 2: Building Your Own Tool
Creating your own expense tracker is straightforward. You can store it on cloud services like Google Drive, Dropbox, iCloud, or OneDrive, making it accessible from any device, whether it’s a smartphone, tablet, or laptop.
For my tool, I utilized Excel for several reasons:
- The formulas are user-friendly and do not require advanced programming knowledge.
- The same formulas can be adapted for use in other software like Google Sheets or Numbers.
- Copy-pasting cells allows for easy duplication of formulas.
Note: I’m using the English version of Excel. If you have a different language version, please translate the formulas accordingly. I also use a semicolon (;) as a separator in my formulas—what do you use? If translating the formulas is challenging, feel free to download my version at the end.
Step 1: Document Your Expenses
To start, note down your recurring expenses (monthly, quarterly, semiannually, or annually) and your fixed monthly income from various sources.
You will need three sheets in Excel for this expense tracking tool:
- Lists Sheet – named “Lists”
- Monthly Sheets – for each month from January to December
- Overview Sheet
#### The Lists Sheet
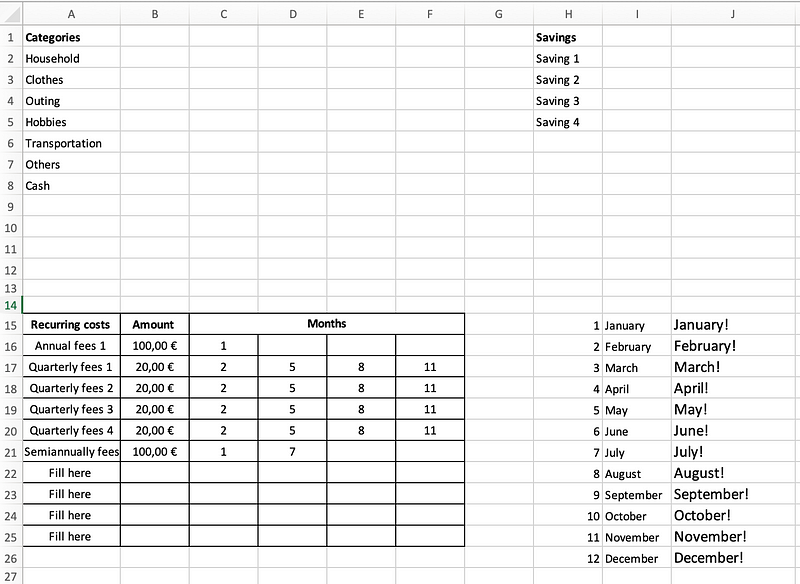
In this sheet, you will create four lists essential for the tool:
- Categories for monthly variable expenses.
- The months of the year.
- Recurring charges.
- Savings goals.
Here’s a simplified view of how the Lists Sheet will appear:

In cell J15, enter the formula =I15&"!” and drag down from the corner of the cell. This will be useful in the following steps.
The "Categories" list will serve as a dropdown menu. You can create categories like “House,” “Car,” and “Vacation.” The “Cash” category tracks cash withdrawals from your bank. Feel free to modify and expand this list to meet your needs.
The “Recurring Costs” list includes non-monthly charges that may occur quarterly, semiannually, or annually. Write down these amounts and the months when they are due, as illustrated in the screenshots.
#### The Monthly Sheets
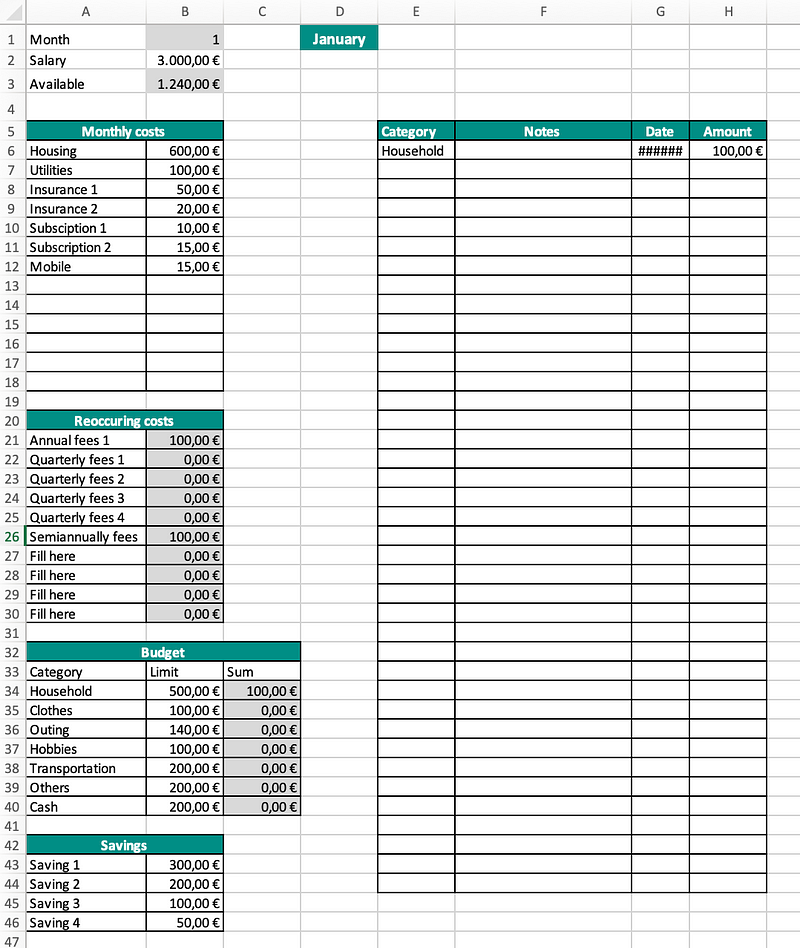
You will duplicate the January sheet eleven more times to cover the entire year. It’s crucial that the January sheet is complete and accurate, as it will serve as the template. The colored cells will contain formulas.

The formula in cell B3 calculates your available funds for the month by subtracting all expenses and savings from your salary:
=B2-SUM(B6:B18;B21:B30;C34:C40;B43:B46)
Cell B21 has a more complex formula that outputs recurring expenses based on the month. For example, it checks if the current month matches entries in the Lists Sheet and returns the relevant amount.
This formula includes both the IF and OR functions. The IF function provides a specific value if the condition is true, while the OR function checks if at least one of its variables is true.
You can copy and paste formulas to streamline the process across your sheets, ensuring each month’s data is updated automatically.
Create an Expense Tracker in Excel in 14 Minutes - This video offers a fast-paced guide on setting up an expense tracker in Excel, perfect for beginners.
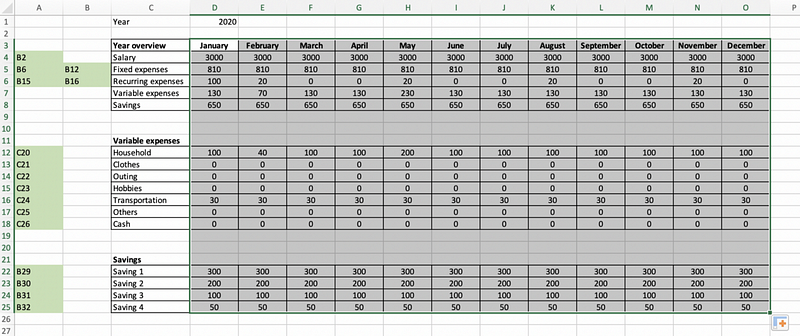
The Overview Sheet
The overview sheet gives a snapshot of all your expenses and income for the year, which is invaluable if you plan to use this tool long-term. I’ve been utilizing this tool since 2016 via my Dropbox account.
You can reference specific cells from the monthly sheets to summarize your data in this sheet. For example, the formula in D4 will retrieve salary information, while D5 will sum up expenses based on the categories listed.
After completing the January sheet, simply copy it and rename it for the subsequent months.

This guide is your first step towards a healthier budgeting and expense tracking journey. Each dollar will have a purpose and will not be misallocated.
While many apps are available for budgeting and expense tracking, they often come with costs and lack customization options. Creating your own tool is simple, adaptable, and easily updatable without waiting for a developer.
You can download the tool here.
Feel free to connect with me on various social media platforms:
Instagram | LinkedIn | Clubhouse | Bitclout
If you're interested in more content like this, consider signing up for membership. Your support helps sustain the stories you enjoy, and if you join through my link, I’ll earn a small commission which is greatly appreciated.